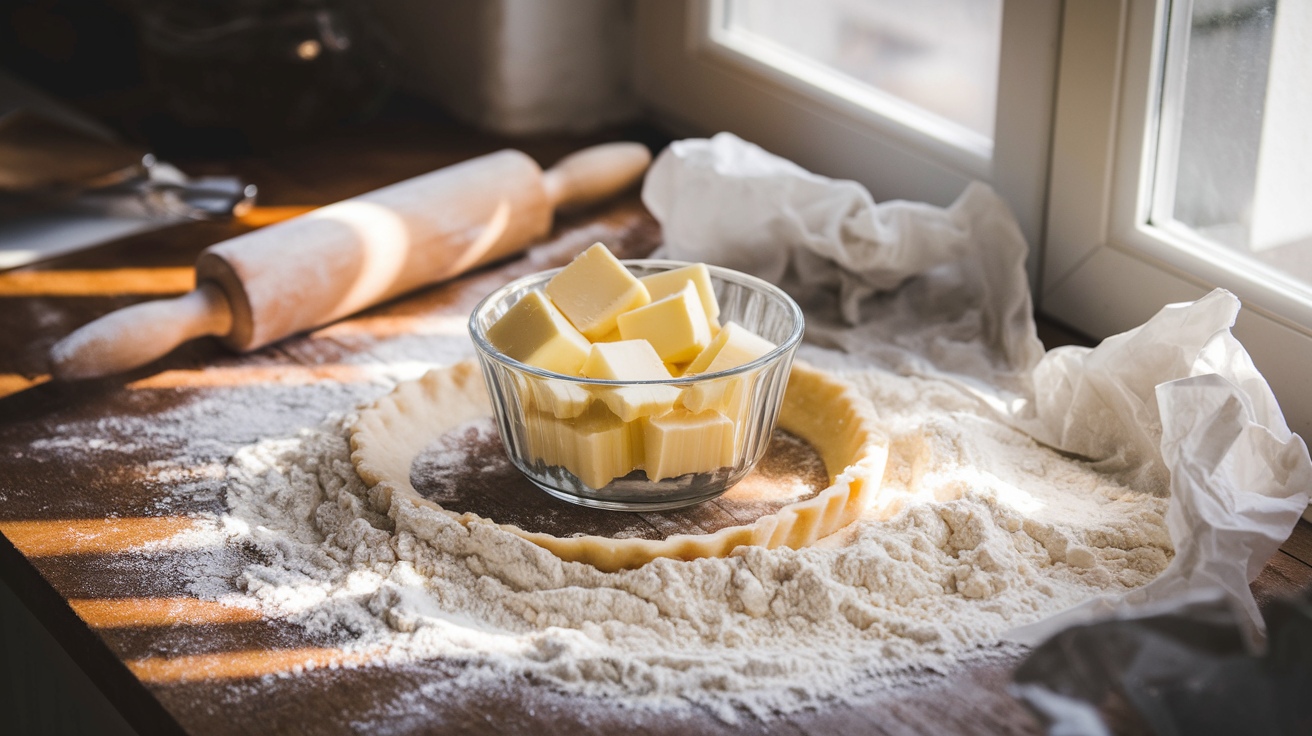
How Do You Make Pie Crust Without a Food Processor?
To make a pie crust without a food processor, start by combining all-purpose flour, cold butter, shortening, sugar, and salt in a bowl. Use your fingertips to blend the butter until it resembles damp breadcrumbs.
Gradually add ice-cold water, stirring just until the dough holds together. Form the dough into a disc and chill it for about 30 minutes.
Roll it out on a floured surface, and you’ll have a flaky crust ready for baking. Discover more tips to perfect your pie crust.
Key Takeaways
- Use a large mixing bowl and a pastry cutter to blend cold butter and flour until it resembles damp breadcrumbs.
- Incorporate ice-cold water gradually, one tablespoon at a time, mixing with your fingertips until the dough clumps together.
- Form the dough into a disc, cover it, and refrigerate for 20-30 minutes to relax gluten and enhance flakiness.
- Roll out the chilled dough on a floured surface, applying even pressure from the center outward to achieve 1/8 inch thickness.
- Preheat the oven and prepare the crust with weights for blind baking, ensuring it stays flat and doesn’t bubble during cooking.
Ingredients Needed for Pie Crust
When you’re ready to make a delicious pie crust, you’ll want to gather a few key ingredients that come together to create the perfect base.
Start with all-purpose flour, which provides the structure you’ll need. For a rich, flaky texture, cold butter and shortening are essential. If you’re after a touch of sweetness, consider adding a bit of sugar, though it’s optional.
Don’t forget the salt, as it enhances the overall flavor. When mixing, use ice-cold water to moisten the dough without making it sticky. Keeping all ingredients cold is crucial for the best results.
Essential Tools for Making Pie Crust
When you’re making pie crust, having the right tools can make all the difference. Measuring cups guarantee you get the perfect amount of flour and butter, while a pastry cutter helps you blend them effectively for that flaky texture.
Plus, working on a cold surface keeps your dough from becoming too warm, which is essential for a delicious crust. Using a large mixing bowl can also help you combine your ingredients more easily, ensuring a smooth and consistent dough.
Measuring Cups Importance
Accurate measurements are vital in pie crust preparation, and using measuring cups effectively can make all the difference.
When you measure dry ingredients like flour, opt for dry measuring cups, guaranteeing you level them with a straight edge for precision. Remember, one cup of sifted flour can weigh around 4 ounces, but this varies based on how you measure it.
Using the spoon and level method helps prevent compaction, which can lead to over-measuring. Consistency in your technique is essential, as even small changes can affect your crust’s texture. Improper measuring can lead to excess weight, which might compromise your crust’s quality.
While kitchen scales offer more precision, mastering measuring cups will enhance your baking skills and guarantee delicious results every time.
Using Pastry Cutter Effectively
A pastry cutter is an essential tool in your baking arsenal, especially when it comes to creating a perfectly flaky pie crust. This handy gadget lets you cut cold butter into flour effortlessly, ensuring each piece of butter remains distinct.
As you work, coat the butter with flour to minimize gluten formation, which can toughen your crust. Remember to handle the dough gently; overworking it can lead to a dense result. Very cold butter is essential for pie crust, as it helps achieve that desired flakiness.
If you don’t have a pastry cutter, don’t fret using a fork or two knives works too. Always keep the dough chilled to prevent the butter from melting, maintaining that coveted flakiness.
Cold Surface Necessity
Creating a flaky pie crust hinges on maintaining a cold surface during preparation. When you work on a cool, floured surface, it prevents the butter from melting, ensuring your dough stays delightfully flaky.
Start by chilling your countertop with ice packs or using marble, which retains cold temperatures. Always have your butter and water ice-cold to maintain that essential chill. Laminated dough is particularly effective in enhancing flakiness, making it easier to roll out while keeping the butter chunks small.
As you roll out your dough with a rolling pin, keep everything lightly floured to prevent sticking. A cold environment is your best friend aim to work quickly and efficiently.
If you notice the dough warming up, pop it in the refrigerator for a few minutes. This simple practice can make all the difference in achieving that perfect pie crust.
Preparing the Ingredients
When making pie crust, you’ll want to start with the right ingredients to guarantee a delicious result. Choose all-purpose flour for a balanced texture, and add a pinch of sugar to enhance browning. Use cold, unsalted butter, cutting it into small cubes, which helps maintain that flaky texture.
Remember to incorporate ice water to keep everything chilled, and a dash of salt to enrich the flavor and bolster the gluten. A great pie crust is characterized by a flaky texture and excellent flavor.
Here’s a quick reference table for your ingredients:
| Ingredient | Purpose |
|---|---|
| All-purpose flour | Base for structure |
| Sugar | Promotes browning |
| Cold butter | Secures flakiness |
| Ice water | Keeps dough cold |
| Salt | Enhances flavor |
Mixing Flour and Butter by Hand
After gathering your ingredients, the next step involves mixing the flour and butter by hand to achieve that coveted flaky texture.
Start by using your fingertips to work the cold butter into the flour, squeezing until the mixture resembles damp breadcrumbs. Aim for butter pieces the size of peas to walnuts; this variety helps create steam pockets during baking. Very cold dough should be baked in a very hot oven (425°F) to ensure the best results.
Make certain the butter is coated with flour to reduce gluten formation, enhancing tenderness. Smear some of the flour-coated butter between your palms to create thin sheets, promoting flakiness.
Remember to keep your hands cool to prevent melting the butter. Stop mixing when you see irregular pieces of butter this’ll guarantee your crust turns out delightfully flaky!
Adding Water to Form Dough
When adding water to your dough, using ice water is key to keeping everything cool and maintaining that flaky texture you crave. Pour in the water gradually, one tablespoon at a time, and stir to check the consistency you want it to clump together without being sticky.
Pay close attention to how the dough feels; the right balance will make all the difference in your final pie crust. Remember that keeping ingredients cold will help prevent the fats from melting before baking, ensuring the flakiness you desire.
Importance of Ice Water
To achieve the perfect pie crust, incorporating ice water is essential for maintaining the right texture and structure. Cold water inhibits gluten development, which is key to creating a tender, flaky crust.
By using ice water, you guarantee that fats stay solid, resulting in distinct layers that create a delightful flakiness when baked. The cold temperature hydrates the flour just enough to form a cohesive dough without overworking it, which can make your crust tough.
Plus, working with chilled ingredients, like butter and flour, further enhances the flakiness. Remember to mix the ice water in gently, as minimal handling keeps your crust light and airy, leading to a delicious dessert that’ll impress everyone!
Gradual Addition Technique
While it might be tempting to pour all the water into your dough at once, the gradual addition technique is crucial for achieving the ideal pie crust. By adding water slowly, you prevent overhydration, which can lead to a tough crust.
Use a wooden spoon or rubber spatula to mix the dough after each addition. You’ll know it’s ready when it can be shaped into a ball without falling apart.
Remember, the amount of water needed can vary based on flour type and environmental conditions. Using cold butter straight from the fridge or freezer is essential for creating a tender, flaky pie dough.
| Step | Action | Purpose |
|---|---|---|
| Add Water | Pour in small amounts | Prevents overhydration |
| Mix | Stir gently after each addition | Guarantees even distribution |
| Check Dough | Shape into a ball | Confirms proper hydration |
Dough Consistency Indicators
Achieving the perfect dough consistency hinges on several key indicators that signal when you’ve added just enough water.
Pay close attention to these signs:
- Cohesive Mass: The dough should stick together without crumbling.
- Temperature Control: Keep your dough around 68-72°F for ideal handling.
- Gentle Touch: Handle the dough lightly to avoid toughness. Rolling dough to a thickness of 1/8 inch is crucial for optimal baking results.
- Visual Cues: Look for a smooth texture that holds shape when gently pressed.
Resting and Chilling the Dough
Resting and chilling the dough are essential steps that greatly impact the final texture and flavor of your pie crust.
Resting allows the gluten in the flour to relax, resulting in a dough that’s easier to roll and less prone to shrinkage.
Form your dough into a 1 cm thick disc, wrap it tightly in clingfilm, and let it rest in the refrigerator for up to 24 hours. Proper chilling time is crucial to achieving the desired flakiness and structure in your crust.
Chilling the dough for 20 to 30 minutes keeps the fat cold, which is vital for that flaky texture. Remember, cold fat maintains the dough’s structure, preventing it from melting too quickly.
After chilling, let the dough warm up slightly before rolling to avoid cracking.
Rolling Out the Dough
As you prepare to roll out the dough, it’s crucial to guarantee your workspace is ready for a smooth process. Start by ensuring everything’s floured to prevent sticking:
- Lightly dust a flat surface with flour.
- Sprinkle more flour on top of the dough.
- Dust your rolling pin with flour.
- Keep your ingredients cold for a flaky crust.
Now, place the rolling pin in the center of the dough and roll forward, applying your body weight for pressure. It’s important to chill pie dough in the refrigerator for at least 30 minutes before rolling to enhance the texture.
Rotate the dough 1/8 turn after each roll to maintain a circular shape. Remember, avoid rolling over the edges to keep them thick. Aim for about 1/8 inch thickness, and if the dough cracks, let it rest for a few minutes to soften.
Baking the Pie Crust
Once you’ve rolled out your pie crust and chilled it, you’re ready to bake it to perfection. Preheat your oven to 375°F (190°C).
Line the crust with parchment paper or foil, filling it halfway with pie weights or dried beans to prevent puffing. Place the pie plate on a baking sheet for stability. Bake the crust for 15 minutes, then carefully remove the weights and parchment.
Dock the bottom with a fork to allow steam to escape. This step is essential for preventing bubbling in the crust. Return it to the oven for an additional 10-15 minutes until golden brown.
Depending on your pie, you might need a fully baked or partially baked crust, so adjust your baking time accordingly.
Storage Tips for Pie Crust
When it comes to storing pie crust, proper preparation can make a world of difference in maintaining its freshness and flavor. Here are some essential tips to keep in mind:
- Form pie dough into balls or discs for easier storage.
- Wrap dough tightly with plastic wrap or wax paper to prevent air exposure.
- Place wrapped dough in airtight zipper bags or containers.
- Label bags with the date and contents for easy identification.
For short-term storage, keep it in the refrigerator for up to three days. Homemade pie crust can be prepared ahead of time for convenience, allowing you to enjoy freshly baked pies without the last-minute rush.
If you freeze it, store in the coldest part of the freezer for up to four months.
Frequently Asked Questions
Can I Use Whole Wheat Flour Instead of All-Purpose Flour?
Yes, you can use whole wheat flour instead of all-purpose flour!
Just keep in mind that it’ll give your crust a nuttier flavor and denser texture. You might need to adjust the liquid since whole wheat flour absorbs more moisture.
To achieve a flaky crust, leave some butter in visible pieces, and handle the dough minimally.
With the right technique, you’ll enjoy a deliciously wholesome pie crust!
How Do I Know When the Dough Is Properly Mixed?
To know when your dough is properly mixed, look for a shaggy, rough appearance. It should hold together when pressed but still feel slightly fragile.
The texture should resemble damp breadcrumbs with visible chunks of fat, indicating it hasn’t been over-mixed. If it feels too wet, it might become tough, so aim for even moisture.
Always remember, a gentle touch helps maintain that tender, flaky crust you’re after!
What Can I Substitute for Butter in the Crust?
If you want a pie crust that’s nothing short of legendary, consider these butter substitutes!
You can use shortening for that flaky texture, or lard for a rich, savory flavor.
Coconut oil adds a unique twist, while margarine mimics butter’s consistency well.
If you’re going plant-based, vegan butter alternatives are your go-to.
Just remember, each option changes the flavor and texture a bit, so choose wisely for your pie masterpiece!
How Do I Prevent My Pie Crust From Shrinking?
To prevent your pie crust from shrinking, start with cold ingredients and handle the dough gently.
Chill it before rolling and leave extra space around the edges to accommodate any shrinkage.
When baking, use pie weights to keep it in place, poke holes in the bottom for even baking, and avoid glass pans.
Finally, refrigerate the crust for at least an hour to relax the gluten, ensuring a perfect, flaky result.
Can I Freeze the Pie Crust After Rolling It Out?
Did you know that about 30% of homemade pie crusts are often frozen for later use?
Yes, you can absolutely freeze your rolled-out pie crust! Simply shape it in a pie plate, wrap it tightly in plastic wrap or foil, and label it with the date.
Storing it in the freezer extends its shelf life to up to three months. This way, you’ll always have a fresh crust ready for your delicious fillings!
The Joy of Making Pie Crust
Creating pie crust by hand may seem intimidating, but with practice, it becomes second nature. Just like a well-crafted story, each step adds depth and flavor to your culinary masterpiece.
Embrace the process, and soon you’ll find joy in the rhythm of mixing, rolling, and baking.
Your homemade pie crust will be a demonstration of your effort, transforming simple ingredients into a delicious canvas for your favorite fillings. So roll up your sleeves and let your creativity shine.